
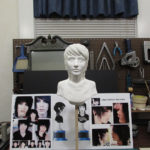
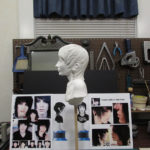
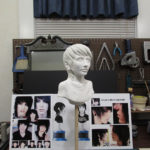
A collage using pics of my art studio and of me creating Johnnie Guilbert’s sculpture. © 2017
Not too long ago, I came up with the idea of expanding my art services to include small sculptures that I would personally sculpt, reproduce, and sell online. I would offer little sculptures of all kinds like mythological figures, famous Greek and Roman statue miniatures, sci-fi, fantasy, and horror film characters, famous historical figures, celebrities, and of famous or influential people on social media like YouTube, Instagram, Twitter, and so on; and these little sculptures would be made in a variety of materials, such as plaster, silicone, resin, and even wax in the form of eco-friendly scented candles. So for the very first time, I am introducing to the world what I call Little Sculpies™ which will hopefully be available very soon in the very near future!
In order to experiment with this new business venture idea, I needed someone interesting to sculpt and someone who has a strong online presence. To start with, I decided to mainly focus on creating small sculpted head busts of famous YouTubers who I personally like and respect. The very first YouTuber I thought of, who I thought would be perfect for this, is a well known, very likable, emo YouTuber named Johnnie Guilbert. He’s a musician, song writer, humorous vlogger, gamer, and more. He has a unique interesting style and personality and has a lot of fans, young and old, who would likely appreciate this type of art and would love to have a reproduction of their very own.
So below is a glimpse into the process I went through, while trying to sculpt one of the first head bust prototypes of him and then create silicone and plaster molds for mass producing them in various materials. It was definitely a learning experience and still is. It wasn’t always easy. I had several setbacks, but I also had a lot of rewarding fun during this artistic product development process.
The Process of Creating the First Little Sculpy Prototype of Johnnie Guilbert
I first started out by searching and collecting good pictures of Johnnie Guilbert to use to do sketch studies of his face from different angles and to design the overall sculpture, including its pedestal.
I used the below pics mainly to examine his frontal view and hair style. I noticed his hair greatly covers his eyebrows but in the prototype, I shortened his bangs a bit to show his eyebrows more. The reason had to do with complications that could arise in mass producing these little sculptures–that’s complicated to explain but it has to do with how the molds are made and how these Little Sculpies™ need to be relatively easy to paint by me and other hired artisans on my staff in order to keep the cost and time it takes to produce them reasonable. I also noticed in most of his photos he doesn’t really smile and when he does it’s usually very slight and subtle like the Mona Lisa smile, which I think looks good, so I hope to reproduce that look.

Below, are some rare side profile shots of Johnnie Guilbert, which were actually kinda hard to find. These shots also helped me to study his hair style and some rare shots of his ears and ear plugs.

Some quick study sketches I drew in Adobe Photoshop to learn certain features of Johnnie’s face.

Below, are more study sketches I drew, using Adobe Photoshop, to help me learn his side profile.

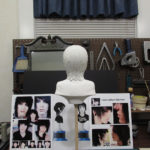
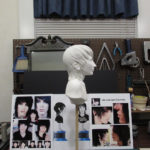
Here, I was designing Johnnie’s head bust sculpture and pedestal (notice there’s no hair yet). The reason why I decided to create a bald version first is because I plan to make a deluxe version that has ‘real’ synthetic doll hair punched into a silicone rubber head.

You’ll see in this later design I greatly reduced the size of the pedestal and shortened its neck. I plan to save the earlier pedestal design, which will include a somewhat ‘secret’ storage compartment in its base for possible private things like flash drives, keys, jewelry, etc. for that deluxe version I may create later on. The deluxe version would of course be higher priced but hopefully worth it in the eyes of his fans and admirers.

Below you get an idea of how I created the eyes. I had to learn to create doll-like eyes to put into the polymer clay sculpture to help visualize his likeness. I could have don’t it without them and simply sculpted his eyes in clay, but resin doll eyes just made it look so much more life-like as you will see in a few pictures down. I searched the Internet for days, watching hours of Do-It-Yourself (DIY) YouTube videos on how to make doll eyes. I could never find the perfect way that met all my needs, so I finally had to devise my own method using a combination of ideas, some of which were entirely my own (I’ll keep as a trade secret). I will give away one of my methods, though, just because the knowledge of it is such a cool thing and selling point. Most Do-It-Yourself doll eye makers paint in the irises and pupils by hand which can be very time consuming and not consistent in appearance or quality. So I decided to print out copies of an actual image of Johnnie’s iris and pupil (digitally enhanced and tweaked a bit and scaled down to the proper size) punch them out with a common hole puncher, and then immerse those into domes of clear resin.

Here is an up close view of some of the eyes I made. Some of them came out a little lopsided, during this first attempt and method which I no longer plan to use for various reasons. If I remember correctly, I think I ended up choosing the pair on the far left. Take a close look, because those are printed images of Johnnie’s actual irises and pupils, which I have to admit were a little creepy to see them all starring at me that day. The white part of the dome is additional clear resin that had been mixed with a white pigment and then poured on top of the smaller clear domed irises after they had cured. It was a lengthy process–too lengthy for me. But for now, for this prototype, it work perfectly well.

Below are pictures where you can see one of the earliest stages of when I actually started sculpting Johnnie Guilbert’s head bust out of semi-translucent Super Sculpey® oven-bake clay.


Some distant shots of Johnnie’s head bust in its earliest phase before I had even put in the eyes. You’ll notice me in the mirror taking pictures, trying to document this whole process, which was very laborious and time consuming in and of itself.

Putting in the eyes I had made was a bit trippy and humorous at first as you can clearly see in the image below. I was so creeped out by this wicked stare that I had to work really late that night to finish sculpting his eyelids, because there was no way I was going to be able to fall asleep knowing this thing existed right next to my bedroom!

Next is a good side view of my work table, while I worked on sculpting the tiny details of his left ear.
One of the biggest challenges in sculpting Johnnie Guilbert was the fact that I had to sculpt him as he would look without any makeup on. Girls, emos, and goths already know this, but a person can look quite different without their makeup on. So I basically had to wait several months until I had painted one of the final resin casts before I even knew whether or not it was going to look anything like him. Also, as I was sculpting him, he kept reminding me of some Egyptian boy king like King Tut, because most of the time he was bald and I kept trying to visualize him wearing his emo eyeliner.

Below is an up close frontal shot after I had worked on it, off-and-on, for about two weeks. I actually had thought about reproducing these Little Sculpies™ in polymer clay, because the semi-translucent skin tone was so real looking, but later learned, after baking Johnnie’s head in the oven to cure it, that they’re likely too brittle and can break in delicate areas if handled too roughly, so for now, I’ve decided against it. I remember I developed the odd habit of stroking his smooth bald head like an evil villain from a James Bond film. I couldn’t help it, I just couldn’t resist.

I should also mention that I intentionally made his eyes slightly larger in scale relative to the rest of his features to accentuate them as doll makers often do. Although, I may reduce them back to normal size in the final prototype I plan to make for maximum realism–not sure yet. You may also notice that I made his right ear jet out slightly more than his left ear as it does in real life. They look that way in all the photos I could find of his ears. It’s totally natural and normal, though. If you examine anyone, closely, no one has perfect symmetry anywhere on their face. So I did that for the sake of realism, but it may have been wasted effort, since his hair will essentially cover them up. I also added a slight tilt to his head for added realism and to look more natural and endearing. When perfectly straight, it looked less alive and somewhat stiff and artificial.
Below is a rare shot that shows the back of Johnnie’s head bust with both ears attached. Those were so hard to align and get even!

It’s finally time to place it into the oven at 275 degrees Fahrenheit for a little over 15 minutes, so it will properly cure and harden. This was the scary part! I’ve worked in polymer oven-bake clay before, but still, one never knows what could go wrong–shrinking, cracking, breaking, weird discolorations, air pockets that could explode, who knows. But it never exploded or melted or anything too weird other than some odd spotting here and there, not sure why, and it did lighten in color which I actually liked, because it made him look more pale and emo and it was closer to his actual skin tone. But none of that really mattered anyway, since this was just a prototype.

Here is a pic of Johnnie’s head bust, resting on a ceramic tile on my living room table, shortly after I took it out of the oven. You may notice the skin tone had lightened a bit. I later did a little refining and detailing work, along with some sanding and smoothing, after it had fully cured.

Below is my first attempt at creating a black foam board container to make my first silicone rubber mold. You can probably notice that odd coloration spotting, which I had mentioned, on top of his head. Perhaps I over baked it, who knows.

I measured and cut out pieces of black foam board and used a hot glue gun to construct a vertical container, so I could pour in a 2-part silicone mixture called Oomoo 30 to form a mold of the original sculpted head bust of Johnnie, which I placed inside (I have video clips of all this which I’m sure I’ll turn into a YouTube video some day in the not too distant future).

My first Oomoo silicone mold turned out pretty good, but I learned that a vertical, seamless mold that you have to cut open was not ideal for mass producing these head busts for a variety of reasons.
Below is one of the pics I took during the time I was experimenting with casting different types of wax materials to possibly turn into eco-friendly scented candles. Notice the neat little black Velcro straps I used to hold the two silicone halves together. That was my idea!

Below, you can see how that first mold turned out. I meant to take some photos of some of the actual wax figures I had created which turned out quite nicely. I have some video clips of them, so maybe later I will grab some screenshots and insert them in here.

The next series of pics shows my second mold attempt (there were a few minor flaws in the first one like air bubbles that got trapped in his mouth and so forth). This time, I decided to construct a foam box that could easily be deconstructed and reconstructed, repeatedly, for multiple uses (no hot glue). Notice how the head bust sculpture and mold container now lay in a more horizontal way. This becomes so advantageous later on. I used long colorful rubber bands to help hold it together, aside from the small furniture tacks. I used a non-drying oil based clay called PLASTALINA (white) to fill in the lower half of the mold and to sculpt the dividing surface of the two halves, so I could exactly determine where the mold seam would be this time, which was along the shirt seam and around the ears so they would be less noticeable.

He looks a little wet and slimy because I had to rub some petroleum jelly over him as a mold release agent, so he wouldn’t stick to the silicone rubber after it cures/dries.

Below, you will see that after the upper half of the mold was poured and had cured, I flipped it over, reassembled the black foam box, applied some petroleum jelly on the back surface of the head bust and on the mold surface so it wouldn’t stick or physically fuse with the second silicone half of the mold I would be pouring.


These next set of pictures show some of the time I spent learning to cast different types of waxes as well as creating plaster molds for a deluxe silicone version of Johnnie’s head bust; first using Plaster of Paris and then using Pottery Plaster, which is a better grade for creating fine detailed molds. I still haven’t quite perfected the technique but I’m getting there. You’ll see in the last two pics that I was heating them in an oven to melt out the wax figures, known as a “lost wax” process (the wax figures can’t be pulled from their plaster molds without breaking them due to the fact that both materials are rigid).
To make a plaster mold, I first have to cast a wax version of the head bust, which takes 24 hours to fully cool and harden, pull away the top half of the silicone mold, and then pour in plaster. Once that hardens enough to be handled (a few hours), I then flip it over, remove the other silicone half, reassemble the black box, apply a release agent on the wax figure and top surface of the first plaster half, and then pour in more plaster to create the second half.

Here you can see how some of those wax casts and plaster molds turned out. Not too bad.


Anyway, to get back to the original version that is to be cast in resin (plastic), using a silicone mold, I started casting multiple head bust reproductions of Johnnie Guilbert in Pottery Plaster, trying to get one without any damn air bubbles, to use in sculpting a new prototype–one with sculpted hair. I finally casted a relatively good plaster head bust to my satisfaction, one with few air bubbles and one that held most of the detail of the original sculpted head bust. I think I may have chosen the one in the middle, not sure.

Here is “the chosen one” I decided to use to sculpt hair onto using original Sculpey polymer clay, which is white and so much softer and cheaper. I wanted to use it for two main reasons, it was white and thus would match the plaster and because it was so malleable and pliable compared to stiffer polymer clays like Super Sculpey. I was also afraid Super Sculpey clay wouldn’t adhere to the plaster head as well. The white softer clay was wonderful to work in and did stick to the plaster head very well. However, the original softer white Sculpey clay does have a tendency to shrink, crack, and break more easily, especially in delicate thin areas, which it did on a few occasions after it had dried for a few days, but thankfully, I was able to fix those areas.

I spent days refining and polishing it to fix certain flaws and to make his skin as smooth as an emo baby’s butt. Notice my little 1978 vintage Spider-Man model in the upper corner!

Here I accidentally snapped a selfie as I was trying to readjust the camera, but it provides another rare shot of the back of Johnnie’s head bust, only this time in plaster.

Here is a close up of “The Chosen One,” which I spent days refining and polishing. I can’t remember if this picture was taken after I had completely finished polishing it, but if not, it looks close to that point. I now had the odd habit of stroking his smooth, bald, ivory white head like an evil villain in an Austin Powers movie. It was relaxing!

Here is a brief slideshow of five pics showing multiple angles of the finished plaster head bust with newly sculpted polymer clay hair during a 360 degree rotation. I later decided I wasn’t fully happy with the way his hair turned out, and so I hope to make a few minor improvements in the way it drapes and blends together in the final prototype I plan to make. I think I came close, though.
Into the oven at 275 degrees Fahrenheit for about 15 minutes to harden that polymer clay. It was a success! No major cracks or broken fragments!

Below, shows my third attempt at making a mold (now needed to reproduce the sculpted hair version of Johnnie’s head bust). This time I decided to make a new mold container, pretty much like the first one, only this time out of wood panels instead of foam which became warped and warn after only a few uses. It’s also important to note that I painted the wooden boards with a gloss paint so the silicone mold could later be easily removed–and it was! For this one, I chose a dark gray colored oil based clay, because I always like to create a good contrast between the sculpted piece and the clay I’m working with, so I can easily discern between the two and because it simply looks cool.


Here is a pic of me pouring a mixed batch of liquid Oomoo 30 silicone rubber to create the first, lower half of my 2-part mold.

Here’s a nice close up shot of me pouring the silicone into the container over the plaster cast that I had sculpted hair onto using original white Sculpey polymer clay (it’s so much softer and cheaper).

These two mold halves came out quite nicely. The best ones so far! I love this photo of Johnnie’s plaster head bust, because the lighting on it was just right and reflects how it usually looks to me in person. In a lot of these other pics it looks a little weird to me due to bad warping effects by the camera lens and bad lighting.

A nice far off bird’s eye view of my work table. It’s amazing how quickly my table would get so messy and need cleaning before I could continue working on this project. I must have cleaned this table over a dozen times!

The next pic shows a fun and exciting day! The day I finally got to pour casting resin into the mold! Actually, this was my second or third attempt, can’t remember. My very first attempt was a disaster, because I had used some very old resin that was years past its shelf-life and, to make matters worse, I also had mixed in some flesh tone acrylic paint that had an unusual chemical in it not normally found in most brands of acrylic artist paints, which interfered with the curing process of the resin. I had to throw it out since it never fully hardened.
I experimented with different resins and coloring techniques (and still am), filling up only one half of the mold (the face half) only part of the way so as not to use up too much resin, which is so damn expensive! One of the resins I experimented with and really liked was very similar to the one I used in the pic below (easy to mix, very few air bubbles, and no strong odors) only it was completely clear instead of white, which can be a good thing if you want to add your own custom colors or tints like I do, but which took 24 hours to cure! I recently discovered a new clear casting resin that was recently developed by another company that hardens within minutes. The resin I’m currently working with in the pics below starts out as completely clear and then in about a minute or two starts to cloud up and turn white and then hardens in about five minutes. I can mix pigments into it as well, but it’s difficult to achieve really dark colors, due to the white, and I wouldn’t be able to create translucent colored resin casts if I ever needed or wanted to.

I won’t fully give away all my trade secrets (I’m leaving out a major part of this process that I had personally developed in order to save on the amount of resin I would have to use to help make these reproductions much more affordable) but, essentially, I poured resin into both halves, allowed them to dry, and then basically put the two halves together. Aside from a little ‘flashing’ around the seams, which is normal in almost any casting process, I think it came out quite nicely. I was really pleased with how it turned out.

Here’s another shot of it after I had sanded it a bit to clean off the flashing and noticeable seams around the ears and head.

Now it was finally time to paint Johnnie’s head bust, a moment I had been waiting on for about three freakin months to find out if it will even come close to looking like him. First, I had to mix just the right emo Johnnie flesh tone, using a rather rare acrylic paint that I’ve work with for years and which is a personal favorite called Chroma’s Josonja Artist Colors, because it is so opaque and has such a beautiful velvet matte finish and, therefore, doesn’t produce or leave any visible brush strokes. It is also one of the best matted acrylic paints to use that has strong binders and adhesion and doesn’t easily crack or peal like the more expensive gouache (pronounced “gwash”) paints sometimes do after awhile.

I also used a special blending brush to help feather in the paint to create an even, smooth, soft skin tone. And by the way, please excuse my nipples showing in these photos. I didn’t realize my art studio lights and camera would pierce through like that. I wear shirts like this and other very thin fabrics like yoga shirts while I work, because it gets so hot under my studio lamps. Just pretend I’m at the swimming pool–no big deal.

Now for the eyeliner, smokey eye-shadow, eyebrows, and lips, which I chose to paint in using oil paints, because they blend with each other so much better than any acrylics and give me ample time to make adjustments! I’d use oil paint to paint the skin but oils, used in large amounts, would take too long to dry and don’t have that uniformly matted look I want that the Josonja paints provide. Notice how smooth I got that skin tone. I was so pleased with how it turned out!

The brush I’m using to paint in these finer details is a no. 1 white sable brush, which are really good at keeping a fine point and remaining flexible and springy.

Here’s another close up angle.

Now for the hair. He is finally starting to get that whole emo look going on, especially once I paint that shirt jet black!

In the pic below, there’s a slight camera lens warping effect which distorts his proportions a bit, making the upper half seem slightly enlarged compared to his lower half, but you get the idea. I’m using more white acrylic paint to paint the name of one of his favorite music bands, My Chemical Romance, onto his black shirt (a shirt he actually owns and occasionally wears). I will likely change this later, either by enlarging the text so much that it can’t be fully read, so as not to get into any legal infringement trouble, or to another shirt label like perhaps the name of his own recently formed band with Jake called, Til Death Do We Part, not sure yet.

The following pic is a far away shot of how it looked after I finished painting it. Now I just need to spray an eco-friendly sealer onto it to help it last down through the ages of time. Who knows, maybe a thousand years from now, in the far distant future, someone will unearth this Little Sculpy of Johnnie Guilbert. Hopefully it will still be in good condition.

I’m still working on designing and creating the prototype and mold for his pedestal. But for now, I used a very small shallow metal container (I removed the lid, turned it upside down, and added a 1/8″ platform) as a mock-up, which is actually quite similar to the size and look of the pedestal design I’ve been working on. I then attached a label that I had previously designed in Photoshop and had printed out onto thin specialty semi-gloss paper; a label design which I tried to personalize to fit Johnnie’s personality. Each person I hope to sculpt one day will get their own personalized label that incorporates their favorite colors (or values like black/white/gray) along with an expression or quote they are known for saying. For example, for Johnnie’s label I added the phrases he usually says at the end of his YouTube videos, “Stay happy not crappy. Life’s a bitch, don’t quit, and Peace out thug pugs!” For now, I’m using a blue-gray marble theme, but he may prefer a darker grayish or black and white marble look–we’ll see.

Ta-da! The first painted resin prototype of a Little Sculpy™ of Johnnie Guilbert!

Here’s a pic of Johnnie’s resin figure resting on one of my display shelves, along side some of my favorite Star Wars figures.

I do plan to tweak a few things in the final prototype to make some good changes and to hopefully make it look even more like Johnnie Guilbert. Wish me luck!

I had originally planned on creating all the trim of his pedestal to have a metallic blue appearance, but again, he may prefer something like silver (like in the mock up above) to give it a more emo look. It would be his choice. I also would like to spray each head bust reproduction with his favorite cologne, one that he may wear often or on special occasions, so his fans and followers could smell that when they first open the box–wouldn’t that be cool! If I actually do start mass producing and selling these, rest assured, I’ll try to get his personal input, preference, and approval on a variety of things like his pedestal label, shirt design, fragrance, and so on, because I want to personalize it as much as possible. And yes, I know his nose ring is missing in this prototype. It will be added in the final product design.
Anyway, I hope you enjoyed having a glimpse into the process I went through and am still exploring for this new business venture of creating and providing Little Sculpies™ to the world. Let me know what you think!